Showing posts with label bar. Show all posts
Showing posts with label bar. Show all posts
Friday, March 24, 2017
How To Add Custom Text On The Status Bar In Android
How To Add Custom Text On The Status Bar In Android

The Status bar of our android phones is not something that can be controlled neither is it something that can be tinkered to our preference. In as much as there are always a way to tinker with it, theyre not always permanent. While some will love the way there status bar is, there are also some people like me whod like to explore deep in other to modify our status bar to look professional.
Before I venture into the main article, I do like to draw your mind back on how to customize the status bar of your android phone without rooting. Theres no doubt that every tinkering in android involves root access but with material design, theres always a possibility to change and customize your android status bar without having to root your android phone. This method those not always come in a platter of gold and youd like what you will see after following the guide.
Also Read: How To Enable ListView Animation On Any Android Phone.Back to our main article, our main goal here is to learn the safest method that can be used to add custom text on the status bar of our android phone. If youre the geek type, proudly showing your name or your favorite quotes on your android status bar is certainly a cool thing to do. However this method cannot be achieved if your device isnt rooted and thats the main reason we decided to draw you back on How to customize the status bar of your android phone without rooting.
As usual were going to use an Xposed module for this procedure. Thus I guess you already have the official Xposed installer installed on your android phone but if perhaps you havent been able to do that, quickly navigate to the Xposed repository website and make it one of your exclusive app collections since its one of the best app every rooted android users should have.
Add Custom Text To The Status Bar Of Your Android Phone
Were going to be kinky in this method since its something that can be achieved in a twinkle of an eye thus theres no special knowledge nor coding required to carry out this procedure. Firstly youve to locate Xposed installer from your add drawer and launch it. Now tap on the Download section and search for Xposed StatusBar Text.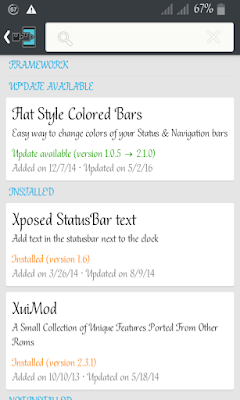
From the result thats been presented, click on it, now swipe the screen to the version section and this time around hit the Download button.
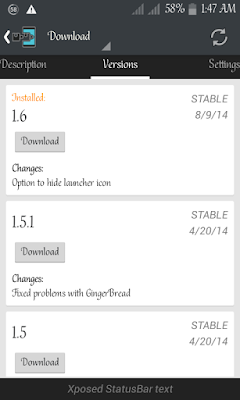
Now after installing the module, navigate back to Xposed installer and tap on the Module section. Tick the Xposed StatusBar box and hit the back button. Next click on Framework and perform a soft reboot in other to enable changes.
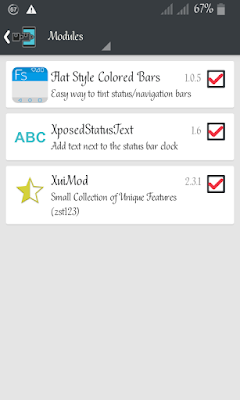
Once your android phone reboots, you should see the module already in action on your status bar. From your app drawer, locate and open Xposed StatusBar Text and easily set or enter your custom text.
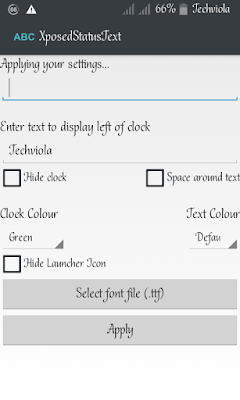
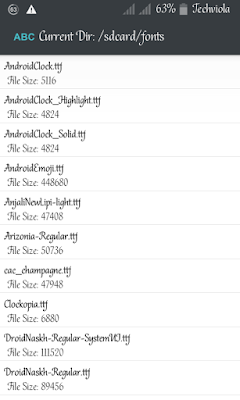
You can also change the text and clock color and most importantly theres an option that allows you to easily select your favorite font from the list of numerous font file presented. After this tap the Apply button.
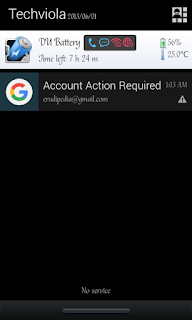
Once youre done, you can minimize your android phone and see the custom text working perfectly. If you draw down your notification bar, you can also see the custom text boldly written and added there.
Final Words
With full knowledge of how android works, theres no doubt that you can make it dance to your tune... The Xposed Modules has been with us right from the on set and its the perfect method of tinkering and modding our android phone to our preference. Simply follow the above steps as directed and see how unique your android phone can be.Available link for download

Tuesday, March 14, 2017
How To Monitor CPU Temperature From Android Status Bar
How To Monitor CPU Temperature From Android Status Bar

Today were going to show you how to monitor, show or display CPU temperature from your android status bar. This trick is quiet simple and also it can help you detect when your android device CPU is getting hot right from your status bar.
At the core of every android phone lies the central processing unit or CPU for short. The main function of the CPU is to carry out or signal instruction on your android phone, practically every pieces of activities you perform on your android phone has to pass through the CPU before it can be able to execute your command.
Also Read: 4 Best Android Apps To Monitor Internet Speed & Data Usage.During the time of heavy loads, such as when youre playing games or other activities from your android phone, the CPU of your device tends to overheat due to the activities youre bombarding in it, thus you will experience some lags and overheating on your android phone. However you can simply monitor the CPU temperature from your android device status bar at a glance.
Were going to unveil two ways to monitor CPU temperature from your android device status bar, the first method will practically be for rooted users while the second steps can be done both on rooted and non-rooted android phone.
#1. Monitor CPU Temperature From Android Status Bar (Root)
This method is only for rooted users, as it involves an xposed module in other for you to be able to Monitor CPU temperature from your android device status bar. If youre not rooted, simply scroll down and follow the second instructions.Requirements
- Rooted android device
- Xposed Framework
- Unknown source enable
Step 1: Installing "CPUTemp in Statusbar"
Download and install xposed framework on your android device, open the app and click on the download section from there search for "CPUTemp in Statusbar". Then tap on the result, swipe over to the version tap and click Download.
Step 2: Activating " CPUTemp in Statusbar" From Xposed
Now you need to activate the xposed module "CPUTemp in Statusbar" after installing it. From your xposed installer home screen, tap on the Modules section and tick the "CPUTemp in Statusbar". Go back and tap on framework section then perform a Soft reboot to activate changes.
Step 3: Configuring " CPUTemp in Statusbar "
Once your phone reboots, the CPU temperature will already be displayed on your device status bar. So lets customize it to look more fancy. Open CPUTemp module from your app drawer, from the first option you can set the interval at which you want your CPU temperature to be updated.
Now tap position to change the spot at which you want your CPU temperature to be displayed. By default the CPU temperature is displayed just at the left of your android status bar, however you can position it to the Right, Absolute-Left or leave it on the Left if you prefer.

Next tap on Display as to set the CPU temperature either in Celsius or Fahrenheit. By default its in Celsius so you can simply change it. Also you can opt not to display the actual unit itself by deselecting the "Show unit".

The Color-Mode is set to Auto by default in other to match your status bar colour automatically, however you can set it to manual and tinker with the color, but if perhaps you choose the temperature colour mode, you can be able to make adjustments to be Low and Middle. Tinker with the colors to your preference.

So this is how to Monitor CPU temperature from the status bar of your android phone using the CPUTemp in Statusbar xposed module.
#2. Monitor CPU Temperature From Android Status Bar (No Root)
If you havent rooted your android device due to reasons best known to you, then you can also Monitor your CPU temperature with the below guide.Requirements
- Unknown Source enabled
- CPU Temperature
Step 1: Downloading CPU Temperature
CPU temperature is an app developed by moon cakes which enables you to check or monitor your android device CPU temperature right from your statu. So open your Google play store, search for CPU temperature and download it.
Step2: Installing & Permitting Usage Access In CPU Temperature
Now after installing the app, you need to permit usage access by toggling the button on the screen. Then you will get to see the home screen which displays the CPU usage, the RAM and battery percentage.
Step3: Configuring CPU Temperature
Next you need to head over to the Settings tab , locate and toggle the CPU Temp Overlay option. Now you will see the CPU temperature smiling at your android device status bar.
Conclusion
Guess were here again, so thats the procedure to Monitor CPU Temperature From Your Android Status Bar. With this feature, you will be able to manage your device to avoid overheating. Drop your comments below if youve any queries and also endeavor to share this post.Available link for download
Sunday, January 29, 2017
How To Customize the Status Bar Notification Panel On Android
How To Customize the Status Bar Notification Panel On Android

Have you ever thought of the possibility to customize your android phone (kitkat or jellybean) status bar to look classic just like that of lollipop and marshmallow devices?. Or perhaps you want to feel how the interface of your jellybean or kitkat phone will look like when tinkered into lollipop. Whatever your reasons might be, we are here to guide you. After the android lollipop 5.0 was launched, it came with a total system UI which from every notch differs from that of android kitkat and jellybean device. Whenever the word "Customize" is been mentioned, the first thing that tends to pop into our mind is Root Access. However you dont have to worry about that now, because we are going to tinker/customize your android phone from all notch without your device having a root access.
Also Read: How To Launch Your Favorite Apps From The Notification Panel On Android.The guide we are going to share wont involve any Xposed Modules since it doesnt require root access. To customize your android phone, we are going to use an app know as "Material Status Bar". I came across this app when I was researching for a way to enable dynamic status bar on any android phone which i will certainly post later. However you can use this app (material design) to tinker and make your status bar auto-match with any current app youre running.
Material Status Bar was developed with the aim of giving you a lollipop/marshmallow status bar with material design look and feel. The app has been bombarded with many features which we are going to unveil as this article unmask itself. With material status bar, you can enable heads up notifications, change the color of your status bar and make it blend with any running app, and also material status bar is capable of modding your notification bar to look like lollipop/marshmallow. Enough said already, lets get down to the main business.
#1. Download & Install Material Status Bar
Firstly you need to download and install Material Status Bar from the Google play store, the app has both free version and the pro version which cost a token, apart from the full screen ads integrated in the free version, the app are almost identical. So download or purchase whichever one you prefer and install it.
Now locate material status bar from your app drawer and tap on it to open. From the home screen of the app you will see some options, however, toggle the icon at the top right corner of your phone screen a popup will emerge.

Now you need to enable the services presented to you in other to allow material status bar work correctly. There are two shortcut namely Notification & Accessibility. Firstly tap on notification and it will take you to another home screen as shown below.

Now from the screen presented to you, tap on "Material Status Bar". Then toggle the "OFF" icon. A popup will again emerge asking if you want to use the app since it will observer your actions, just tap OK to grant it permission.

Now use your back button and return to material status bar home screen, select Notifications this time around and a new home screen will emerge, tick material status bar and from the popup, tap OK to allow material status bar read all your system notifications.

#2. Customize The Status Bar
Once youve done the steps above, then youre almost there. As said earlier, the main menu of the app has some few options, so lets run through them individually. Make sure the toggle icon at the upper right corner is enable. Under theme, you have four options & by default its in Lollipop, but you can choose the one you desire.
Now if youve selected any option from the theme, it will automatically change the colors of the status bar according to any running app just like Dynamic Status Bar Feature on Lollipop. Now head over to Transparent status bar and select your default launcher, in other to make your status bar transparent when youre on the home screen. Make sure youre using a non-scrollable wallpaper in other for this to work.

However if it fails to change the color of any running app, tap on App List and select any app you which to set its custom color, a popup will emerge, you can drag the scroll bar to choose your desired colour or simple search for the color palette of that particular app. Example Facebook colour palette is #3b5998, copy it and paste it on the color picker box from the emerge popup then tap Set. Open the app (Facebook) & you will see that the status bar matches with the Facebook color.

Now the next option remaining is the "Color Picker", its main function is to get color from screenshot. Tap on it and on the next click "Select Image" from the upper right corner, your gallery will be launched, select any image. Now once you tap on any part of the selected image, the action bar color will change or blend with the selected image color. Tap "Copy Color" at the upper right corner & youre done.

Now go back to the App list and choose any app you which to change its custom color, for instance I selected my default launcher. Paste the color you copy earlier on in the color picker box and tap Set. Locate and open the app you tinkered with its color and see the result. Below is my default launcher home screen. (Note the transparent status bar can do this work better).

Now if you swipe from the left of material status bar or tap the three horizontal line icon in the upper left, you will see some options which you can tinker with. So lets have a glimpse at some of its function.

Under customize, you can see about five options, you can tick the box available and see there function on the status bar. This looks cool, as it helps to set a center clock and shows battery percentage. Make sure "Autonomous start" us enabled, in other to auto start this feature when your phone boots up.

Now under the notifications panel, you can change how the notification panel looks when you pull it down from the status bar. Toggle the notification panel and make sure other boxes are ticked (optional).

Now once the notification panel is ticked, toggle the status bar again and pull down the notification panel to see changes. You can upgrade to the pro version to get more themes and features.

The heads up notifications is one of the best features that was launched on every android lollipop, however material status bar can enable it right from the heads up option. Under the Heads Up option, make sure its toggled and from the style option you can select either light or dark. Also you can choose your heads up position to appear either below status bar, over status bar or bottom of screen.

The backup & Restore option can come in handy when you want to save your color codes and also import them (color code) from previous backups.

What To Gain With The Pro Version Of Material Status Bar
The Pro version of material status bar comes with lots of features and themes that can completely change the experience of your android phone. However it cost only a token but you can purchase it to unlock most of the restricted features and themes. Below is one of the themes and features you can unlock once you purchase the pro version.
Guess this is it, N465.00 or $1.50 cant restrict you from laying your hands on material status bar Pro. If you can stomach the price, then youre good to go. Customizing your status bar can never be easy without a rooted android phone and some few xposed modules, but material status bar made it 100% easy for us. Enjoy your new transformed kitkat/jellybean device.
Available link for download
Subscribe to:
Posts (Atom)