Showing posts with label notification. Show all posts
Showing posts with label notification. Show all posts
Monday, March 27, 2017
How to Launch Favorite Apps From Notification Panel On Android
How to Launch Favorite Apps From Notification Panel On Android

Notification panel is arguably one of the best useful features ever made or developed in android. In such a way that it enables you to easily navigate through your system settings. However, while the notification panel is always useful for varieties of purposes, it still does not allow you to take control over it. Often at times, we get feed up from accessing our favorite applications through the app drawer. Since the notification panel is something we access every time, it kind of seems right if we can easily Launch some of our favorite apps right from the Notification panel. This comes in handy when youre in a haste to access any of your apps thus you get to find it easily from your notification panel instead of the app drawer.
Also Read: How To Increase the RAM of Your Android Phone With or Without Root.Accessing your favorite apps from the notification panel can never be easy if you dont find the right procedure. There are times when you download a third party app and it will automatically place its app icon on your notification panel without your permission, but what if you can actually control your notification panel by adding your favorite apps to it and access it when you feel like?. This is what were here to guide you on. In this article were going to show you how to add and Launch your favorite apps from the notification panel using Bar Launcher. Its a free tool and does not require any rooted android smartphone before you can enable this features. Below is what bar launcher is capable of doing on your android phone.
Bar Launcher is a small and awesome tool with which you can launch your favorite apps from the notification area. Its function is pretty simple, it adds your favorite apps to the notification panel from the configuration app and permits you to have quick access to them forever. Also you can configure, edit, delete, undo, rearrange, drag and drop your favorite apps the way you want. Bar Launch proves to be useful when you need to access something quick as said earlier on, lets say you want to access your bible, you can do it without even exiting your current app. All you have to do is to drag your notification panel down and see your most favorite apps beckoning on you to launch them.
How To Launch Your Favorite Apps Using Bar Launcher.
Firstly you need to download bar launcher, its a free tool developed by Johannes Obermair. You can download it from the Google playstore by clicking here.
Now once youve installed the app (Bar Launcher), locate and Launch it from your application drawer and you will be presented with the home screen interface like below.
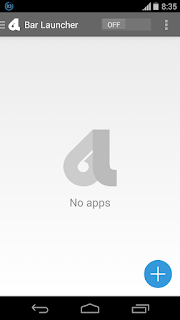
As you can see from the above image, things look pretty scanty in the bar launcher app, but were going to tinker it. To begin with, click on the plus sign and on the popup you will be able to select/add some of your favorite apps you wish to show at the notification panel.
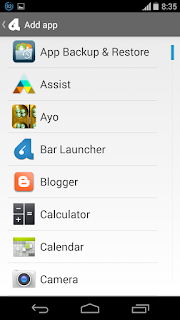
Now tap on the apps you wish to appear at your notification panel, you can select as many as you want since the app has no limit. Once you select an app, the list will disappear and the app will show up on the bar launcher main screen. Repeat the process to add more apps.
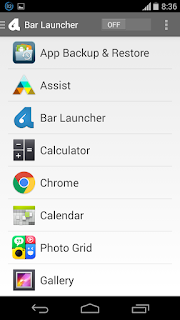
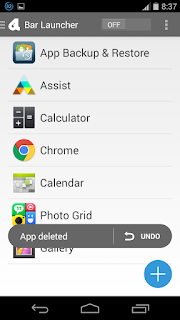
Also bar launcher allows you to replace or undo any app. Thus if you add a wrong app by accident, you can easily tap on the app to replace it with another one or swipe the app to the left or the right in the configuration app to delete it from the notification, and if you change your mind, just undo the action.
Once youve added all your favorite apps, you can also rearrange them. By default, the app at the top will be the first to show on your notification panel and the one at the bottom will be the last. To do this, simply tap and hold over one of the apps, and then drag, to change its position.
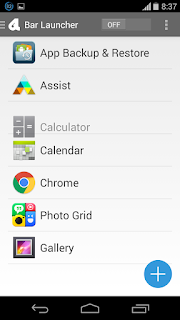
Now in order to make all the favorite apps you added on the list to show in your notification panel, you need to toggle the "OFF" button at the top right corner of bar launcher in order to activate your favorite apps on the notification panel.
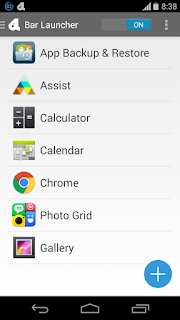
Now to check if your favorite apps has been shshown on your notification panel, just drag the notification panel down and see them smiling at you peacefully.
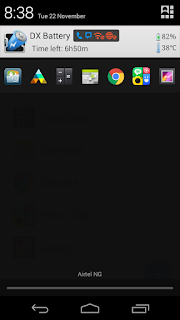
Bar launcher also allows you to add multiple rows of apps, so you can add over 5 apps at once or simply organize your apps into sections. To do this, tap on the three dotted line on the top right corner of bar launcher and select "Add row". Now just add new apps like you did earlier on, you can see all current app by sliding from the left.
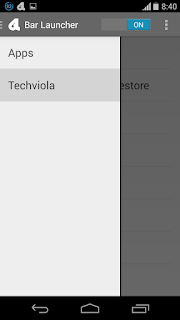
However there are something you might want to set up in the bar launcher app settings. Now locate and open the bar launcher from your app drawer, tap on the three dotted line on the top right corner of the app and click on settings.
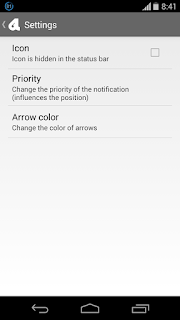
Now you will be presented with three option to tinker with. The icon option allows you to show or hide the bar launcher icon from the status bar when when enabled. So I suggest you untick it.
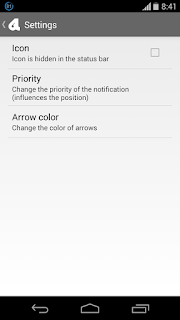
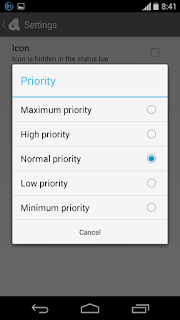
The priority option on the other hand prevents bar launcher from been at the second line at your notification panel. By default its in " Normal Priority"so you can set it to "Maximum Priority" in other to make it show first at the notification panel.
The “Arrow color” option allows you to change the color of the arrows used to switch rows on the notification panel, so you can leave it to "White" by default or change it to "black" by custom.
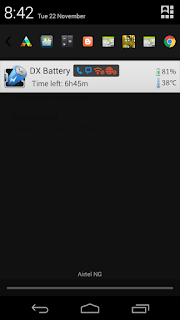
Guess its as simple as we mentioned earlier on, customizing bar launcher is extremely easy and simple, one of the best thing I like about this app is that its fast and light. You wont even notice youve such an awesome app installed on your android phone until you pull down your notification panel. Buzz launch functionality leaves no question, the developer made it look classic and easy. Just follow the instructions above and see your favorite apps smiling peacefully at your notification panel. Leave a comment behind and endeavor to share this post.
Available link for download

Sunday, January 29, 2017
How To Customize the Status Bar Notification Panel On Android
How To Customize the Status Bar Notification Panel On Android

Have you ever thought of the possibility to customize your android phone (kitkat or jellybean) status bar to look classic just like that of lollipop and marshmallow devices?. Or perhaps you want to feel how the interface of your jellybean or kitkat phone will look like when tinkered into lollipop. Whatever your reasons might be, we are here to guide you. After the android lollipop 5.0 was launched, it came with a total system UI which from every notch differs from that of android kitkat and jellybean device. Whenever the word "Customize" is been mentioned, the first thing that tends to pop into our mind is Root Access. However you dont have to worry about that now, because we are going to tinker/customize your android phone from all notch without your device having a root access.
Also Read: How To Launch Your Favorite Apps From The Notification Panel On Android.The guide we are going to share wont involve any Xposed Modules since it doesnt require root access. To customize your android phone, we are going to use an app know as "Material Status Bar". I came across this app when I was researching for a way to enable dynamic status bar on any android phone which i will certainly post later. However you can use this app (material design) to tinker and make your status bar auto-match with any current app youre running.
Material Status Bar was developed with the aim of giving you a lollipop/marshmallow status bar with material design look and feel. The app has been bombarded with many features which we are going to unveil as this article unmask itself. With material status bar, you can enable heads up notifications, change the color of your status bar and make it blend with any running app, and also material status bar is capable of modding your notification bar to look like lollipop/marshmallow. Enough said already, lets get down to the main business.
#1. Download & Install Material Status Bar
Firstly you need to download and install Material Status Bar from the Google play store, the app has both free version and the pro version which cost a token, apart from the full screen ads integrated in the free version, the app are almost identical. So download or purchase whichever one you prefer and install it.
Now locate material status bar from your app drawer and tap on it to open. From the home screen of the app you will see some options, however, toggle the icon at the top right corner of your phone screen a popup will emerge.

Now you need to enable the services presented to you in other to allow material status bar work correctly. There are two shortcut namely Notification & Accessibility. Firstly tap on notification and it will take you to another home screen as shown below.

Now from the screen presented to you, tap on "Material Status Bar". Then toggle the "OFF" icon. A popup will again emerge asking if you want to use the app since it will observer your actions, just tap OK to grant it permission.

Now use your back button and return to material status bar home screen, select Notifications this time around and a new home screen will emerge, tick material status bar and from the popup, tap OK to allow material status bar read all your system notifications.

#2. Customize The Status Bar
Once youve done the steps above, then youre almost there. As said earlier, the main menu of the app has some few options, so lets run through them individually. Make sure the toggle icon at the upper right corner is enable. Under theme, you have four options & by default its in Lollipop, but you can choose the one you desire.
Now if youve selected any option from the theme, it will automatically change the colors of the status bar according to any running app just like Dynamic Status Bar Feature on Lollipop. Now head over to Transparent status bar and select your default launcher, in other to make your status bar transparent when youre on the home screen. Make sure youre using a non-scrollable wallpaper in other for this to work.

However if it fails to change the color of any running app, tap on App List and select any app you which to set its custom color, a popup will emerge, you can drag the scroll bar to choose your desired colour or simple search for the color palette of that particular app. Example Facebook colour palette is #3b5998, copy it and paste it on the color picker box from the emerge popup then tap Set. Open the app (Facebook) & you will see that the status bar matches with the Facebook color.

Now the next option remaining is the "Color Picker", its main function is to get color from screenshot. Tap on it and on the next click "Select Image" from the upper right corner, your gallery will be launched, select any image. Now once you tap on any part of the selected image, the action bar color will change or blend with the selected image color. Tap "Copy Color" at the upper right corner & youre done.

Now go back to the App list and choose any app you which to change its custom color, for instance I selected my default launcher. Paste the color you copy earlier on in the color picker box and tap Set. Locate and open the app you tinkered with its color and see the result. Below is my default launcher home screen. (Note the transparent status bar can do this work better).

Now if you swipe from the left of material status bar or tap the three horizontal line icon in the upper left, you will see some options which you can tinker with. So lets have a glimpse at some of its function.

Under customize, you can see about five options, you can tick the box available and see there function on the status bar. This looks cool, as it helps to set a center clock and shows battery percentage. Make sure "Autonomous start" us enabled, in other to auto start this feature when your phone boots up.

Now under the notifications panel, you can change how the notification panel looks when you pull it down from the status bar. Toggle the notification panel and make sure other boxes are ticked (optional).

Now once the notification panel is ticked, toggle the status bar again and pull down the notification panel to see changes. You can upgrade to the pro version to get more themes and features.

The heads up notifications is one of the best features that was launched on every android lollipop, however material status bar can enable it right from the heads up option. Under the Heads Up option, make sure its toggled and from the style option you can select either light or dark. Also you can choose your heads up position to appear either below status bar, over status bar or bottom of screen.

The backup & Restore option can come in handy when you want to save your color codes and also import them (color code) from previous backups.

What To Gain With The Pro Version Of Material Status Bar
The Pro version of material status bar comes with lots of features and themes that can completely change the experience of your android phone. However it cost only a token but you can purchase it to unlock most of the restricted features and themes. Below is one of the themes and features you can unlock once you purchase the pro version.
Guess this is it, N465.00 or $1.50 cant restrict you from laying your hands on material status bar Pro. If you can stomach the price, then youre good to go. Customizing your status bar can never be easy without a rooted android phone and some few xposed modules, but material status bar made it 100% easy for us. Enjoy your new transformed kitkat/jellybean device.
Available link for download
Subscribe to:
Posts (Atom)